
Are you tired of crooked shelves, uneven tiles, or walls that just don’t line up right? Using a laser level can be a game-changer for your projects, making sure everything is perfectly straight and balanced.
But getting accurate results isn’t always as simple as turning it on. If you want your work to look professional and save time fixing mistakes, you need to know exactly how to use a laser level correctly. You’ll discover easy tips and tricks to boost your precision and confidence every time you pick up your laser level.
Keep reading—your next project depends on it!
Choosing The Right Laser Level
Using a laser level helps you make sure things are straight and even. Picking the right laser level is key to getting good results.
There are different types of laser levels. You should think about your needs and budget before buying one.
Types Of Laser Levels
Laser levels come in several types. Each type works best for certain tasks.
- Dot Laser Levels: Show small dots for basic alignment.
- Line Laser Levels: Project horizontal or vertical lines.
- Rotary Laser Levels: Spin to create a 360-degree level line.
- Combination Laser Levels: Offer more than one type of laser.
Choose a type that fits your project size and complexity.
Factors To Consider
Think about where and how you will use the laser level. This helps you pick the right features.
- Range: Check how far the laser can reach.
- Accuracy: Look for small margin of error.
- Visibility: Make sure the laser is easy to see.
- Power Source: Battery life or plug-in options.
- Durability: Choose a model that can handle your work environment.
Extra features like self-leveling or wall mounts can help with accuracy and ease of use.
Budget Vs. Features
Laser levels come in many prices. Higher price often means more features and better quality.
Think about what features you really need. Don’t pay for extras you won’t use.
- Basic models work for small projects and indoor use.
- Mid-range models offer better accuracy and more features.
- High-end models are good for large jobs and outdoor use.
Choose a laser level that fits your budget and meets your project needs.
Credit: www.youtube.com
Setting Up Your Laser Level
Using a laser level needs careful setup for good results. Setting it up right saves time and avoids mistakes.
Follow simple steps to prepare the surface, mount the device, and calibrate it before use.
Preparing The Surface
Check the surface where you will place or aim the laser level. It should be clean and flat.
Remove dust, dirt, or objects that can block the laser beam or cause errors in measurement.
Mounting And Positioning
Place the laser level on a stable tripod or flat surface. Make sure it does not move during use.
Adjust the height and angle so the laser beam covers the area you want to measure or mark.
- Use a tripod for uneven surfaces
- Position the level to avoid obstacles
- Check the beam’s path before starting
Powering On And Calibration
Turn on the laser level and wait a few seconds for it to stabilize. Some models self-level automatically.
If your device needs manual calibration, adjust the settings until the bubble or digital indicator shows level.
- Check the manual for calibration steps
- Use the bubble vial or digital display
- Recalibrate if the surface moves
Calibrating For Accuracy
Using a laser level accurately starts with proper calibration. Calibration ensures the laser beam is straight and true.
Without calibration, measurements can be off and cause errors in your project.
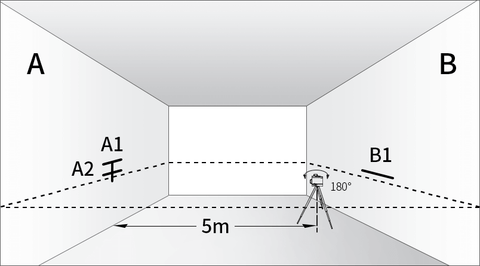
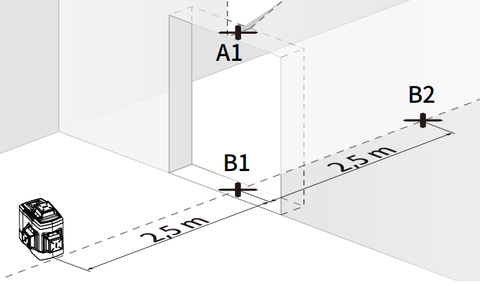
Checking Level Calibration
Check your laser level calibration before each use. Place the laser on a flat surface and turn it on.
Mark the laser line on a wall or surface, then rotate the device 180 degrees. Mark the line again.
- If the marks line up, the laser is calibrated.
- If the marks do not line up, you need to adjust the calibration.
Adjusting The Laser Beam
Adjust the laser beam using the screws or knobs on your device. These controls let you fine-tune the beam.
Make small adjustments and check the line again. Repeat until the laser is perfectly level.
- Use a bubble level to help guide your adjustments.
- Turn adjustment screws slowly to avoid over-correcting.
- Check the calibration after each adjustment.
Troubleshooting Common Issues
Sometimes, the laser level may not work as expected. Dirt, damage, or battery issues can affect accuracy.
Check for these common problems if your laser is not calibrated properly.
- Clean the laser lens to remove dust or debris.
- Replace batteries if the laser beam is weak or flickering.
- Inspect the device for physical damage or loose parts.
- Store the laser level properly to avoid misalignment.

Credit: huepar.com
Techniques For Perfect Alignment
Using a laser level helps you make straight and even lines. It is important to use the right techniques for perfect alignment.
This guide shows how to use reference points, mark and measure correctly, and work with multiple levels.
Using Reference Points
Start by choosing clear reference points on your work surface. These points help guide your laser line for accuracy.
Make sure the reference points are stable and easy to see. This reduces errors when aligning your laser level.
- Select fixed spots like edges or corners
- Check that points are not moving
- Use a pencil or tape to mark points
- Align the laser line with these points
Marking And Measuring
Marking your measurements clearly helps keep your project accurate. Use a sharp pencil or marker for visible marks.
Measure distances carefully before placing the laser level. Double-check measurements to avoid mistakes.
- Measure twice to confirm accuracy
- Mark points along the laser line
- Use a tape measure or ruler
- Keep marks small but visible
Working With Multiple Levels
Using several laser levels at the same time helps with complex projects. It ensures all parts are aligned in different areas.
Check each laser level is set correctly and does not interfere with the others. This keeps your work precise.
- Place each laser level on a firm surface
- Set each level to the right height
- Turn on one laser at a time to avoid confusion
- Use a helper to watch multiple lines
Safety Tips When Using Laser Levels
Laser levels are useful tools for precise measuring and alignment. Using them safely helps avoid injuries and keeps your work accurate.
Follow safety rules to protect your eyes, handle the device carefully, and keep your laser level in good condition.
Protecting Your Eyes
Laser beams can harm your eyes if you look directly at them. Always avoid staring into the laser beam or pointing it at others.
Wear safety glasses designed to filter laser light. This extra protection helps reduce eye damage risk during use.
- Never look directly into the laser beam
- Do not point the laser at other people
- Use laser safety glasses when needed
- Keep the laser turned off when not in use
Handling Equipment Safely
Hold the laser level firmly to prevent it from falling or moving. A stable laser gives more accurate readings.
Set up the laser level on a flat surface or tripod. Avoid using it in wet or slippery areas to reduce accident risk.
- Hold the laser level with a steady grip
- Use a tripod for better stability
- Keep work areas clean and dry
- Turn off the device before moving it
Maintaining Your Laser Level
Clean the laser level regularly to remove dust and dirt. Clean lenses help keep the laser beam clear and bright.
Store the laser level in a safe, dry place. Check batteries and replace them as needed to avoid sudden power loss.
- Wipe the lens with a soft cloth
- Keep the device in its case when not used
- Check and change batteries regularly
- Inspect the laser level for damage often
Advanced Tips For Professionals
Using a laser level accurately improves your work quality. Professionals need precise techniques for best results.
These tips will help you handle laser levels in different environments and boost your productivity.
Using Laser Levels Outdoors
Outdoor use can be tricky due to sunlight and uneven ground. Use a laser detector to see the beam in bright light.
Set the laser level on a stable tripod. Check that it is level before starting work for best accuracy.
- Use laser detectors for bright conditions
- Place the level on a steady tripod
- Check and adjust the level before use
- Shield the laser from direct sunlight if possible
Integrating With Other Tools
Combine your laser level with measuring tapes and digital distance meters. This helps confirm measurements quickly.
Using a smartphone app with your laser level can help record measurements and create plans on the spot.
- Use tape measures for double-checking
- Digital meters add precise distance data
- Smartphone apps help track and save data
- Combine tools to reduce errors
Maximizing Efficiency
Plan your setup before starting. Place the laser and targets where you can work without moving the device often.
Keep batteries charged and carry spares. Quick setup and maintenance reduce downtime and keep work flowing.
- Plan laser and target positions carefully
- Keep extra batteries ready
- Regularly check the laser’s calibration
- Use clamps or mounts for hands-free work
Credit: dovoh.com
Frequently Asked Questions
What Is The Best Way To Set Up A Laser Level?
Position the laser level on a stable surface or tripod. Ensure it’s perfectly horizontal or vertical by adjusting the leveling screws or auto-leveling feature.
How Do I Calibrate A Laser Level Accurately?
Place the laser level on a flat surface. Mark the laser line, rotate the tool 180 degrees, and check for alignment differences. Adjust calibration screws if needed.
Can A Laser Level Be Used Outdoors Effectively?
Yes, but bright sunlight can reduce visibility. Use laser detectors or choose models with high-output lasers for better outdoor performance.
How Far Can A Laser Level Project An Accurate Line?
Most laser levels project lines accurately up to 100 feet. Distance may vary by model, so check specifications for precise range.
Conclusion
Mastering a laser level boosts your project accuracy. Practice makes perfect. Begin with small tasks. Build confidence gradually. Remember, patience is key. Follow manufacturer instructions carefully. Adjust settings as needed. Always ensure the laser is stable. Double-check measurements often. Correct use prevents costly mistakes.
Safety comes first. Wear protective gear. Keep tools clean and well-maintained. Consistency in practice leads to skill improvement. Soon, using a laser level becomes second nature. Enjoy the precision and ease it brings. Happy leveling!
9 min read