
Imagine never fumbling for your keys again or worrying about lost copies falling into the wrong hands. You want a smart door lock system that gives you control, security, and convenience—all without breaking the bank.
What if you could build one yourself, tailored exactly to your needs? In this guide, you’ll discover simple steps to create your own DIY smart door lock system. By the end, you’ll have the know-how to upgrade your home’s security with technology you built yourself.
Ready to take control of your door? Let’s get started.
Choosing The Right Components
Building a DIY smart door lock system is a fun project. It’s important to choose the right components for success. This guide will help you pick the best parts for your smart lock.
Careful selection of components ensures your lock is safe and reliable. Let’s explore the key parts you will need.
Selecting The Microcontroller
The microcontroller is the brain of your smart lock. It controls the lock and sensors. Choose one that fits your needs and budget.
Popular options include Arduino and Raspberry Pi. These are user-friendly and widely supported by communities.
- Arduino: Easy to program, great for beginners.
- Raspberry Pi: More powerful, supports complex tasks.
- ESP8266: Affordable, built-in Wi-Fi for wireless control.
Picking The Lock Mechanism
The lock mechanism is a key part of your smart door lock. It should be strong and reliable to secure your door.
Choose a mechanism that works with your door type. Electromagnetic locks and motorized deadbolts are popular choices.
- Electromagnetic Lock: Strong, needs constant power to stay locked.
- Motorized Deadbolt: Fits standard doors, battery-operated.
- Servo Lock: Simple and cost-effective for light doors.
Additional Sensors And Modules
Additional sensors enhance your smart lock’s functionality. They add security and convenience features.
Consider modules like RFID readers and fingerprint scanners. They allow easy access control and tracking.
| Sensor Type | Function |
| RFID Reader | Card-based access |
| Fingerprint Scanner | Biometric access |
| Bluetooth Module | Remote control via smartphone |

Credit: www.reddit.com
Gathering Tools And Materials
Building a DIY smart door lock system needs the right tools and parts. Getting everything ready helps the project go smoothly.
Knowing what tools, electronic parts, and safety gear to use saves time and avoids problems later.
Essential Tools Checklist
Good tools make it easier to build and install your smart lock. Keep these tools handy before you start.
- Screwdrivers (Phillips and flathead)
- Wire strippers and cutters
- Soldering iron and solder
- Multimeter for testing circuits
- Drill with bits for wood and metal
- Measuring tape or ruler
- Hot glue gun or electrical tape
- Small pliers or tweezers
Required Electronic Parts
Electronic parts control your smart lock. Make sure you have all these parts before you start assembling.
- Microcontroller (like Arduino or ESP8266)
- Servo motor or electronic door strike
- Power supply or batteries
- Wires and jumper cables
- Push buttons or keypad for input
- Bluetooth or Wi-Fi module (optional)
- Resistors, capacitors, and transistors
- LED indicators (optional)
Safety Gear
Safety gear protects you while working with tools and electronics. Always wear the right equipment.
- Safety goggles to protect your eyes
- Work gloves to guard your hands
- Mask to avoid dust and fumes
- Fire extinguisher nearby for emergencies
- Well-ventilated workspace
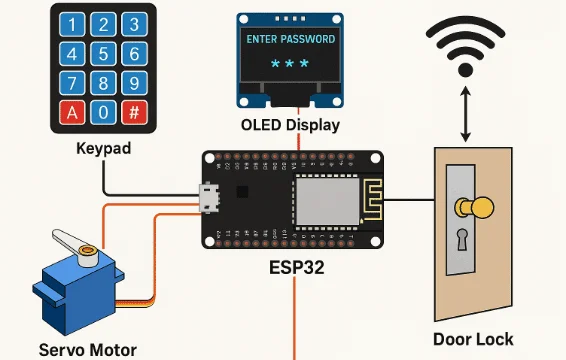
Planning The Circuit Design
Creating a DIY smart door lock needs careful circuit planning. This helps the system work well and stay safe.
Good circuit design connects all parts like the microcontroller, lock, sensors, and power. It also makes sure each part gets the right signals and power.
Wiring The Microcontroller
The microcontroller is the brain of your smart lock. Connect it properly to control other parts.
Use clear and short wires to avoid confusion. Make sure each pin is connected to the right component.
- Connect power pins to a stable voltage source
- Attach input pins to sensors or buttons
- Link output pins to the lock and indicators
- Use a breadboard for easy testing
Integrating The Lock And Sensors
The lock is the main part that controls door access. Sensors detect if the door is open or closed.
Connect the lock’s control wire to the microcontroller output. Attach sensors to input pins to send signals back.
- Use a relay or transistor to control the lock motor
- Connect door sensors to digital input pins
- Check sensor signals with the microcontroller code
- Place sensors where the door moves freely
Power Supply Setup
Power your smart lock with a stable and safe power source. The circuit needs constant voltage to work well.
Choose a power supply that matches your microcontroller and lock requirements. Protect the circuit with fuses or regulators.
- Use a 5V or 12V DC power supply as needed
- Add voltage regulators for stable output
- Include a fuse for safety
- Use rechargeable batteries for backup power
Programming The Microcontroller
Programming the microcontroller is a key part of building your DIY smart door lock system. This step tells the lock how to behave.
You will write code that controls the lock, manages access, and tests functions to ensure safety.
Writing The Control Code
Start by writing the main code that runs the lock. This code tells the microcontroller what to do.
Use simple commands to control the lock motor and check sensors for door status.
- Initialize hardware like motors and sensors
- Set input pins to read keypad or RFID
- Write functions to lock and unlock the door
- Use delays and checks to avoid errors
Setting Up Access Credentials
Access credentials allow only authorized people to open the door. You need to program these into the microcontroller.
Common credentials include PIN codes or RFID tags. Store them safely in the device memory.
- Create a list of valid PIN codes or tag IDs
- Write code to compare entered codes with stored data
- Set limits on wrong attempts to increase security
- Allow easy adding or removing of credentials
Testing The Software
Testing ensures your code works correctly with the hardware. Run tests before final assembly.
Check if the lock responds to correct credentials and blocks wrong ones. Test all sensors and motors.
- Test locking and unlocking functions
- Verify access control with different credentials
- Check sensor input for door open/close status
- Fix any bugs or errors found during tests
Assembling The Lock System
Building a DIY smart door lock system involves putting different parts together. This step is important to make the lock work properly.
Careful assembly helps the lock stay strong and secure on your door. Follow clear instructions for best results.
Mounting The Hardware
Start by fixing the lock hardware on your door. Make sure the lock fits the door thickness and shape.
Use screws and brackets that come with your lock kit. Align the parts so the lock can move smoothly.
- Mark holes on the door where the lock will be placed
- Drill holes carefully to avoid damage
- Attach the lock body to the door
- Secure the strike plate on the door frame
Connecting Components
Link the electronic parts like the motor, sensors, and circuit board. These parts help the lock work smartly.
Follow the wiring guide to connect each component correctly. Make sure wires are tight and safe.
- Connect the motor to the control board
- Attach sensors to detect door status
- Link the power source to the system
- Use connectors or solder wires for strong links
Securing The Assembly
Check all parts are fixed tightly. Loose parts can cause the lock to fail or break.
Test the lock by locking and unlocking several times. Make sure it works smoothly and safely.
- Tighten all screws and bolts
- Cover exposed wires with tape or casing
- Test the system’s response to commands
- Adjust parts if the lock does not move well

Credit: www.familyhandyman.com
Testing And Troubleshooting
Testing and troubleshooting are key steps in building your DIY smart door lock system. These steps help ensure the system works correctly and safely.
By checking each part carefully, you can find and fix problems early. This saves time and prevents damage.
Running Functional Tests
Start by checking if all parts respond as expected. Test the lock’s motor, sensors, and control board separately.
Use simple commands to open and close the lock. Listen for unusual sounds or delays in response.
- Test the lock motor by sending open and close signals
- Check sensor signals with a multimeter or software monitor
- Verify the control board reads inputs and sends outputs correctly
- Try the system with different user codes or keys
- Observe the lock’s reaction to low battery conditions
Common Issues And Fixes
Some problems happen often when building smart locks. Knowing common issues helps you fix them fast.
- Lock motor not moving:Check power supply and connections.
- Sensor errors:Clean sensors and ensure correct wiring.
- Control board not responding:Reset the board and re-upload code.
- Battery drains quickly:Use fresh batteries and check for shorts.
- Delay in lock action:Optimize code or check communication speed.
Optimizing Performance
Good performance makes your smart lock reliable and fast. Focus on smooth operation and low power use.
Use simple code and efficient hardware. Test the system under different conditions to find improvements.
- Reduce unnecessary sensor checks to save power
- Use interrupts instead of constant polling in code
- Calibrate sensors for accurate readings
- Choose a motor with the right speed and torque
- Ensure a strong wireless signal if using remote control
Enhancing Security Features
Creating a DIY smart door lock system can improve your home security. Adding smart features helps keep your home safe and controlled.
Smart locks let you control who enters and monitor activity easily. You can add advanced options to make your lock more secure.
Adding Biometric Authentication
Biometric authentication uses unique body features to unlock the door. Fingerprint scanners are a common and safe way to add this feature.
This method stops unauthorized people from entering. You can install a fingerprint sensor near the lock for easy use.
- Use a fingerprint sensor module compatible with your system
- Store authorized fingerprints securely in the device memory
- Test the scanner for quick and accurate recognition
Implementing Remote Access
Remote access lets you control the lock from anywhere using a smartphone. This feature allows you to lock or unlock doors without being home.
You can connect the smart lock to Wi-Fi or Bluetooth. Use an app or web portal to manage access and check door status remotely.
- Choose a wireless module like Wi-Fi or Bluetooth
- Secure the connection with strong passwords or encryption
- Use a mobile app to send lock commands and receive updates
Setting Up Alerts And Logs
Alerts notify you if someone tries to open the door. Logs keep records of who accessed the door and when.
This helps you track activity and spot any unusual attempts. You can set alerts to send messages or notifications to your phone.
- Use sensors to detect lock status and door movement
- Program alerts for failed or forced entry attempts
- Keep a log of access times and users for review

Credit: www.reddit.com
Maintaining Your Smart Lock
Keeping your smart lock in good condition helps it work well every day. Regular care prevents problems and makes your lock last longer.
Simple maintenance tasks can protect your smart lock from damage and keep it secure for your home.
Regular Inspection Tips
Check your smart lock often to find any issues early. Look at the lock’s physical parts and test its functions.
Inspect the battery, keypad, and sensors for dirt or wear. Make sure the lock moves smoothly without sticking.
- Clean the lock with a soft cloth to remove dust
- Test the lock’s response with your app or keypad
- Listen for unusual sounds when locking or unlocking
- Check battery life and replace if low
Updating Software
Smart locks use software to work correctly. Keep the software up to date for better security and new features.
Check for updates in the lock’s app or website. Install updates as soon as they are available to avoid bugs.
- Open the smart lock app on your phone
- Go to the settings or update section
- Download and install any available updates
- Restart the lock if the update requires it
Replacing Components
Parts of your smart lock can wear out over time. Replace batteries, sensors, or keys to keep the lock working well.
Use parts that match your lock’s model. Follow the instructions carefully when replacing any component.
- Change batteries every 6 to 12 months
- Replace worn-out keypads or buttons
- Swap damaged sensors or wiring
- Use original or compatible parts only
Frequently Asked Questions
What Components Are Needed For A Diy Smart Door Lock?
You need a microcontroller, servo motor, keypad or fingerprint sensor, power supply, and connecting wires. Additional parts include a casing and mounting hardware.
How Do I Program A Diy Smart Door Lock System?
Use Arduino or similar platforms. Write code to control locking mechanisms based on inputs like keypad or fingerprint scans.
Is A Diy Smart Lock System Secure Enough?
DIY systems offer basic security but may lack advanced encryption. Enhance safety with strong passwords and regular updates.
Can I Integrate My Diy Smart Lock With Smartphones?
Yes, by adding Bluetooth or Wi-Fi modules, you can control and monitor your lock remotely via a smartphone app.
Conclusion
Creating a DIY smart door lock system can save money and boost security. You only need some basic tools and clear instructions. Taking your time helps avoid mistakes and ensures the lock works well. Testing the system before daily use is important.
Small steps lead to a safer, smarter home. Try building your own and enjoy the benefits of technology at your door.
12 min read