
Watering plants in containers can be tricky. You want to give them just the right amount of water. Too much water can harm the plants. Too little water can make them dry and weak. Drip irrigation helps solve this problem. It gives water slowly and directly to the plants. This way, plants get the water they need without waste.
What Is Drip Irrigation?
Drip irrigation is a watering method. It uses small tubes or pipes to bring water to plants. The water comes out in small drops or drips. This drip goes right to the soil near the plant roots. It does not spray water all over. This means less water is lost to wind or evaporation.
Drip irrigation is very good for container plants. Containers dry out faster than garden soil. So, plants in pots need water often. Drip irrigation helps by giving water little by little. This keeps the soil moist but not soggy.
Why Use Drip Irrigation for Containers?
- Saves water: Drip irrigation uses water smartly. It wastes less water than watering by hand or hose.
- Gives even watering: Each plant gets the right amount of water.
- Easy to use: Once set up, it saves time and effort.
- Good for plant health: Water goes to roots, not leaves, reducing diseases.
- Works well indoors and outdoors: Perfect for balconies, patios, or greenhouses.
How Does Drip Irrigation Work?
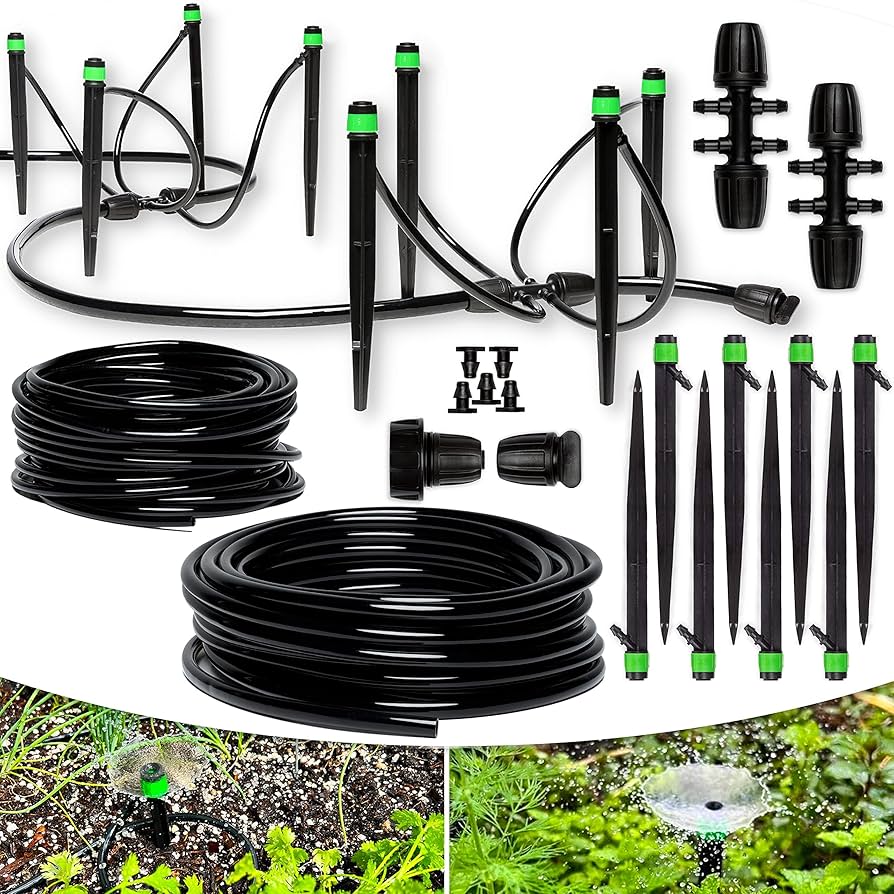
Drip irrigation systems have a few parts. These parts work together to water plants slowly.
| Part | Description |
|---|---|
| Water Source | This can be a tap or rain barrel that holds water. |
| Main Tubing | Plastic tubes that carry water from the source to the plants. |
| Drip Emitters | Small devices that release water slowly at plant roots. |
| Timer (Optional) | Controls when and how long water flows. |
Water moves from the source through the main tubing. Then it flows through the drip emitters. These emitters drip water near the plant roots. This keeps the soil moist and plants healthy.

Credit: www.reddit.com
Setting Up Drip Irrigation for Your Containers
Setting up drip irrigation is easy. Follow these steps to start:
- Choose your containers: Use pots or boxes with drainage holes.
- Pick a water source: Use a garden tap or a water tank.
- Get the materials: Buy drip tubing, emitters, and connectors.
- Plan your layout: Decide how many plants you have and where tubes will go.
- Connect tubing to water source: Attach the tubing to your tap or tank.
- Place emitters near plants: Put one emitter per container near the plant roots.
- Test the system: Turn on water and check for leaks or blockages.
- Set a timer: Use a timer if you want automatic watering.
Tips for Using Drip Irrigation with Containers
Here are some simple tips to help your system work well:
- Check water pressure: Too much pressure can break tubes. Use a pressure regulator if needed.
- Clean emitters: Sometimes emitters get clogged. Clean them every few weeks.
- Use mulch: Add a layer of mulch on top of soil. It keeps moisture in longer.
- Adjust watering times: Water more in hot weather, less in cool weather.
- Watch your plants: Check for signs of overwatering or underwatering.

Credit: www.provenwinners.com
Benefits of Drip Irrigation for Container Gardens
Many gardeners like drip irrigation for containers. Why? Because it offers many benefits:
- Water efficiency: Saves water by delivering it directly to roots.
- Healthier plants: Prevents root rot and leaf diseases.
- Less work: You don’t need to water by hand every day.
- Better growth: Plants grow strong with steady moisture.
- Flexible setup: Works for small or large container gardens.
Common Problems and How to Fix Them
Sometimes problems happen. Here are common issues and solutions:
| Problem | Cause | Solution |
|---|---|---|
| Emitter not dripping | Clogged by dirt or minerals | Clean or replace the emitter |
| Too much water | Emitter flow too high or timer too long | Reduce flow or shorten watering time |
| Too little water | Emitter blocked or low water pressure | Check tubing and water source |
| Leaks in tubing | Damaged or loose connections | Repair or tighten connections |
Choosing the Right Drip Emitters
Emitters control how much water flows out. Different plants need different water amounts. Here are some common emitter types:
- Regular emitters: Release 1 to 2 gallons per hour. Good for most container plants.
- Adjustable emitters: You can change the flow rate. Useful if plants have different needs.
- Micro-sprayers: Spray a small area. Good for plants that like moist leaves.
Match the emitter to your plant’s water needs. This keeps plants healthy and saves water.
Maintaining Your Drip Irrigation System
Good care keeps your system working well. Here is a simple maintenance plan:
- Check tubing and emitters monthly for damage.
- Flush the system every few months to remove dirt.
- Replace worn or broken parts quickly.
- Adjust watering schedule with seasons.
- Store tubing indoors during winter if you live in cold places.
Frequently Asked Questions
How Does Drip Irrigation Work For Containers?
Drip irrigation delivers water directly to the plant roots. This reduces water wastage and ensures efficient hydration.
What Are The Benefits Of Drip Irrigation?
Saves water. Reduces weeds. Improves plant health by delivering water directly to the roots.
Can Drip Irrigation Be Used For All Container Plants?
Yes, drip irrigation suits most container plants. It provides consistent moisture, which is crucial for plant growth.
How Often Should I Run Drip Irrigation For Containers?
Typically, run it once or twice a day. Adjust based on plant needs and weather.
Conclusion
Drip irrigation is a smart way to water container plants. It saves water and time. It helps plants grow strong and healthy. Setting up a drip system is simple and affordable. Once you set it up, watering becomes easier. Your plants will thank you with bright leaves and flowers. Try drip irrigation for your container garden today. You will see the difference it makes!
5 min read