
Ready to take control of your home’s comfort and save on energy bills? Installing a smart thermostat yourself is easier than you think.
Imagine adjusting your home’s temperature from your phone, setting schedules that fit your lifestyle, and watching your energy costs drop—all with a simple device you install in just a few steps. In this guide, you’ll find clear, easy instructions that anyone can follow, even if you’ve never handled home wiring before.
Stick with me, and by the end, you’ll have a smart thermostat up and running, giving you more comfort and savings every day. Let’s get started!
Choosing The Right Smart Thermostat
Installing a smart thermostat can save energy and money. Picking the right one is crucial for optimal performance.
Consider compatibility, features, and budget before making your choice. Here’s a guide to help you decide.
Compatibility With Your Hvac System
Ensure the thermostat works with your HVAC system. Some systems may not support certain thermostats.
Check your system type, like gas, oil, or electric, and confirm compatibility with the thermostat specifications.
- Single-stage heating and cooling
- Multi-stage systems
- Heat pumps
- Electric baseboard
Features To Consider
Look for features that meet your needs. Some thermostats offer more control and flexibility.
Consider features such as remote control, learning capabilities, and integration with smart home devices.
- Wi-Fi connectivity
- Programmable schedules
- Energy usage reports
- Voice control
Budget And Brand Options
Set a budget for your purchase. Thermostat prices vary based on features and brands.
Research different brands for reliability and customer support. Popular options include Nest, Ecobee, and Honeywell.
| Budget | Brand Options |
| Low | Honeywell |
| Medium | Ecobee |
| High | Nest |
Credit: lahvaclc.com
Gathering Tools And Materials
Installing a smart thermostat requires some tools and materials. Getting them ready before you start saves time.
This guide helps you gather everything needed to install your thermostat safely and correctly.
Essential Tools Checklist
Use these tools to install your smart thermostat. Having the right tools makes the job easier.
- Screwdriver set (flathead and Phillips)
- Drill with drill bits
- Wire stripper or cutter
- Voltage tester
- Level
- Measuring tape
- Smart thermostat installation guide
- Small flashlight or headlamp
Safety Gear Recommendations
Wear safety gear to protect yourself during installation. Safety helps prevent accidents.
- Insulated gloves to avoid electric shock
- Safety glasses to protect your eyes
- Dust mask if drilling into walls
- Closed-toe shoes for foot protection
Preparing For Installation
Installing a smart thermostat yourself can save money and give you control. Before starting, get ready to work safely and carefully.
Preparing well helps the process go smoothly. Follow each part carefully to avoid mistakes.
Turning Off Power Safely
Always turn off the power before working on your thermostat. This prevents electric shocks and damage to your system.
Find your home’s circuit breaker and switch off the breaker that powers your heating and cooling system. Double-check that the thermostat screen is off.
- Locate the main electrical panel
- Turn off the HVAC circuit breaker
- Confirm thermostat display is off
- Use a voltage tester if available
Removing The Old Thermostat
Remove the old thermostat carefully to avoid breaking wires. Start by taking off the thermostat cover or faceplate.
Unscrew the base plate from the wall. Gently pull the base away from the wall to expose the wires connected to it.
- Remove thermostat cover
- Unscrew mounting screws
- Pull base plate from wall gently
- Keep screws for new thermostat
Labeling Wires For Reference
Label each wire before disconnecting it. This helps you connect the wires correctly to the new thermostat.
Use small pieces of tape or wire labels. Write down the letter or color of each wire to match your new device’s instructions.
- Use masking tape or wire labels
- Mark each wire with its terminal letter
- Take a photo of wires for extra help
- Disconnect wires carefully after labeling

Credit: airworkssolutions.com
Installing The Smart Thermostat
Installing a smart thermostat helps you control your home’s temperature easily. This guide shows how to install it step-by-step.
Follow the instructions carefully to mount, wire, and set up the display. You do not need special tools.
Mounting The Base Plate
Start by removing the old thermostat from the wall. Make sure the power is off to avoid shocks.
Align the base plate of the new thermostat with the wall plate. Use the included screws to secure it firmly.
- Hold the base plate against the wall.
- Mark screw holes with a pencil.
- Drill holes if needed.
- Screw the base plate tightly.
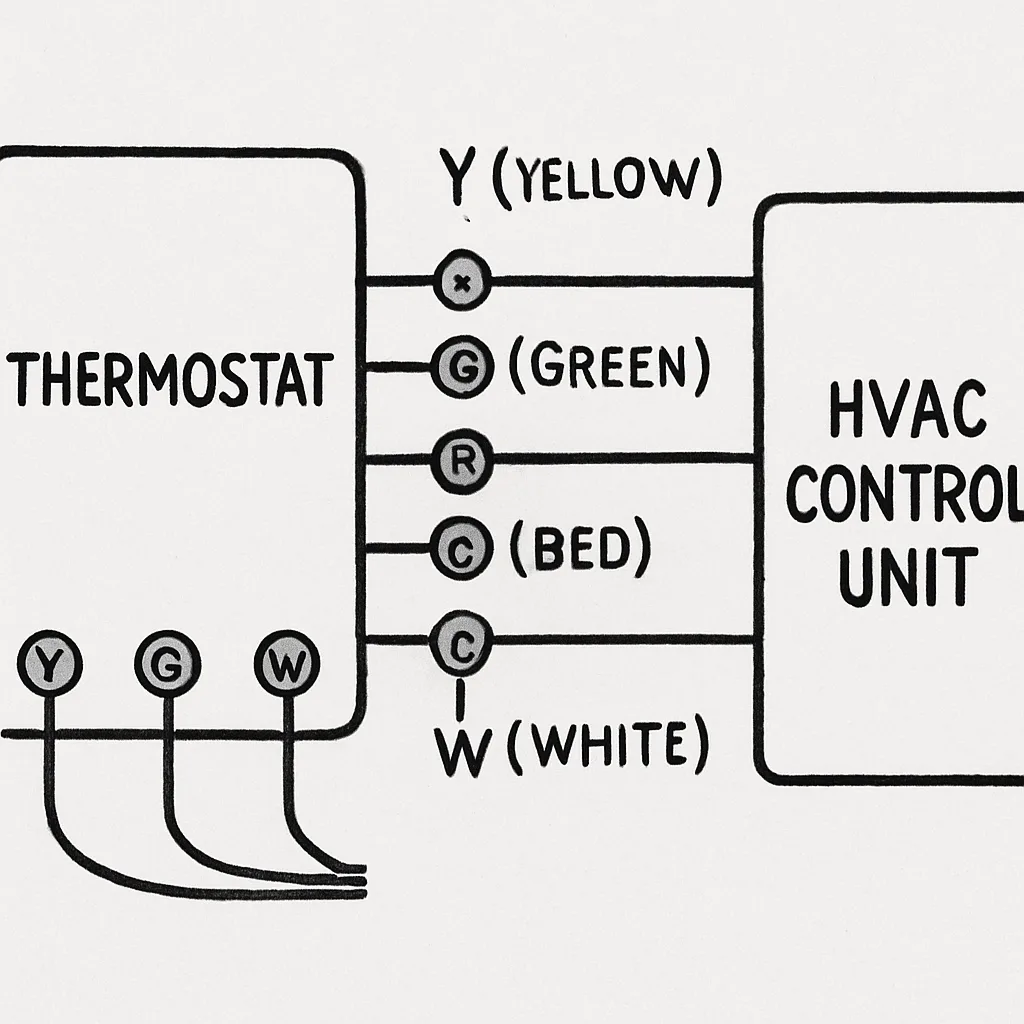
Connecting The Wires Correctly
Identify each wire coming from the wall. Match them with the correct terminals on the thermostat base.
Use the labels or the manual to connect wires. Loose or wrong connections can cause the thermostat to fail.
- Turn off power before touching wires.
- Connect wires to matching labels: R, W, Y, G, C.
- Push wires fully into terminals.
- Double-check each wire is secure.
Attaching The Thermostat Display
After wiring, place the thermostat display onto the base plate. It should click into place easily.
Make sure the display is level and secure. Turn the power back on to test the device.
- Align display with the base plate connectors.
- Press gently until it clicks.
- Check if the screen lights up.
- Follow on-screen setup if needed.
Configuring The Device
After installing your smart thermostat, you need to set it up for use. Configuring the device helps it work with your home’s system.
This guide covers powering on, connecting to Wi-Fi, and customizing settings.
Powering On And Initial Setup
First, turn on the thermostat by pressing the power button or following the manual. The screen will light up.
The device will guide you through basic setup steps like selecting language and temperature units.
- Select your preferred language
- Choose temperature units: Fahrenheit or Celsius
- Set your time zone
- Confirm your home’s heating and cooling system type
Connecting To Wi-fi
Next, connect the thermostat to your home Wi-Fi. This lets you control it from your phone or computer.
Choose your Wi-Fi network and enter the password carefully. The device will test the connection.
- Open the Wi-Fi settings on the thermostat
- Find your home network name
- Type the correct password
- Wait for a confirmation message
Customizing Settings And Preferences
Once connected, customize your thermostat settings. This helps it fit your daily routine.
You can set temperature schedules, adjust screen brightness, and enable energy-saving modes.
- Set heating and cooling schedules by time and day
- Adjust screen brightness and display settings
- Enable eco or energy-saving modes
- Set alerts for maintenance or filter changes

Credit: www.chooseaaronservices.com
Testing And Troubleshooting
After installing your smart thermostat, it is important to test if it works well. Testing helps you know if the system controls your heating and cooling correctly.
If you find problems, troubleshooting can fix many common issues. This guide helps you check your system and solve basic problems.
Verifying System Operation
Turn on your thermostat and set the temperature higher than the room’s current temperature. This should start your heating system.
Next, set the temperature lower than the room’s temperature to check the cooling system. Listen for the HVAC system to respond.
- Check if the thermostat screen shows the correct mode (heat or cool).
- Wait a few minutes to see if the system starts running.
- Feel the vents to confirm warm or cool air flows out.
- Make sure the fan runs when you set it to “On”.
Common Issues And Fixes
If the thermostat does not control heating or cooling, check the wiring first. Loose wires can stop the system from working.
Other issues may include no power, wrong temperature readings, or Wi-Fi connection problems. These can often be fixed easily.
- No power:Check the circuit breaker and thermostat batteries.
- Wrong temperature:Make sure the thermostat is away from direct sunlight or heat sources.
- No response from HVAC:Confirm all wires are connected correctly.
- Wi-Fi issues:Restart your router and thermostat; re-enter the network password.
- System short cycling:Increase the temperature difference to avoid frequent on/off cycles.
Maximizing Smart Thermostat Benefits
Installing a smart thermostat can save energy and make your home more comfortable. To get the most from it, you need to use its features well.
This guide explains how to use mobile apps, set schedules, and connect with other smart devices.
Using Mobile Apps
Most smart thermostats come with a mobile app. This app lets you control the temperature from anywhere.
You can check your home’s temperature and change settings even if you are away. This helps you save energy and stay comfortable.
Setting Schedules For Efficiency
Setting a daily schedule helps your thermostat save energy. You can set different temperatures for daytime and nighttime.
This way, the thermostat adjusts automatically. It uses less energy when you are not home or when you are sleeping.
- Lower temperature during work hours
- Higher temperature before you arrive home
- Cooler or warmer settings at night for comfort
Integrating With Smart Home Systems
You can connect your thermostat to smart home systems like voice assistants. This lets you control the thermostat with voice commands.
Integration also helps your thermostat work with other devices, like sensors, to keep your home energy efficient.
Frequently Asked Questions
What Tools Do I Need To Install A Smart Thermostat?
You typically need a screwdriver, drill, voltage tester, and wire stripper. These tools help safely remove the old thermostat and connect wires to the new one.
How Long Does It Take To Install A Smart Thermostat?
Installation usually takes 30 to 60 minutes. This depends on your wiring complexity and familiarity with electrical work.
Can I Install A Smart Thermostat Without Professional Help?
Yes, many smart thermostats are designed for DIY installation. Follow the manufacturer’s instructions carefully to ensure safety and proper setup.
Will A Smart Thermostat Work With My Hvac System?
Most smart thermostats support common HVAC systems like gas, electric, and heat pumps. Check compatibility with your system before purchasing.
Conclusion
Installing a smart thermostat yourself saves money and gives control. The steps are clear and easy to follow. Take your time and double-check each connection. Test the device to ensure it works correctly. Enjoy better comfort and energy savings at home.
Small effort brings long-term benefits. You can do this!
9 min read