
Are you tired of your mixer taking up too much space on your kitchen counter? Imagine having a sturdy, stylish stand that keeps your mixer at the perfect height and frees up your workspace.
With the right DIY mixer stand ideas, you can create a custom solution that fits your kitchen and your style perfectly. You’ll discover simple, creative ways to build your own mixer stand that saves space, looks great, and makes baking easier than ever.
Ready to transform your kitchen and make your mixer work for you? Keep reading to find out how!
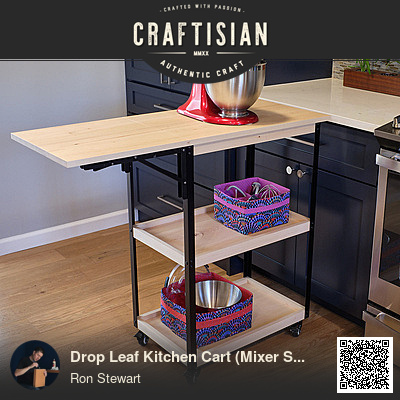
Credit: craftisian.com
Benefits Of A Mixer Stand
A mixer stand is a smart addition to any kitchen. It keeps your mixer safe and easy to use. Building a DIY mixer stand can save space and improve your kitchen setup.
Using a mixer stand helps you organize your kitchen better. It also makes your mixer easy to reach when you need it.
Saving Counter Space
A mixer stand lifts your mixer off the counter. This frees up room for other kitchen tasks. You can use the extra space for prep work or storing other tools.
Some stands have shelves or hooks. These add extra storage without taking more counter space.
- Frees up space for cooking and baking
- Keeps your mixer stable and out of the way
- Allows room for other kitchen items
Improving Kitchen Organization
A mixer stand keeps your kitchen neat. It gives your mixer a specific place to stay. This reduces clutter and makes cleaning easier.
You can also store mixer attachments nearby. This keeps all parts in one spot. It helps you find what you need quickly.
- Designated place for mixer and attachments
- Reduces clutter on counters and shelves
- Makes cleaning faster and easier
Enhancing Mixer Accessibility
A mixer stand raises your mixer to a better height. This makes it easier to use without bending or reaching. You can work faster and more comfortably.
Some stands have wheels or handles. You can move the mixer easily to different spots in your kitchen.
- Makes mixer easier to reach and use
- Reduces strain from bending or stretching
- Allows easy moving of the mixer
Choosing The Right Materials
Building a mixer stand needs strong and steady materials. Picking the right ones helps your stand last long and hold your mixer safely.
Think about the weight of your mixer and how often you will use the stand. Choose materials that fit your budget and skill level.
Wood Options
Wood is a popular choice for mixer stands. It is easy to cut and shape with basic tools. Choose hardwood for more strength.
Softwood is lighter and less expensive but may wear out faster. Always use wood that is dry and free from cracks.
- Oak: strong and durable
- Pine: affordable and easy to work with
- Maple: smooth finish and sturdy
- Birch: hard and good for painting
Metal Choices
Metal stands give a modern look and great strength. Steel and aluminum are common metals used for stands. Steel is heavier but very strong.
Aluminum is lighter and resists rust. You need tools like a welder or metal screws to work with metal materials.
- Steel: very strong, holds heavy mixers
- Aluminum: light and rust-resistant
- Iron: sturdy but may rust without coating
Repurposed Materials
Using repurposed materials saves money and helps the environment. You can use old furniture parts or leftover wood and metal.
Check that repurposed materials are strong and safe. Clean and sand wood, and remove rust from metal before use.
- Old table legs can become stand legs
- Scrap wood can be cut to fit your needs
- Metal pipes can form a sturdy frame
- Reclaimed pallets offer low-cost wood
Simple Stand Designs
Building a mixer stand can help keep your workspace tidy. Simple stands offer stability and easy access.
These designs use common materials and basic skills. You can build them quickly without special tools.
Basic Wooden Platforms
Basic wooden platforms are the easiest stands to make. Use a flat piece of wood as the base for your mixer.
Add four legs or blocks to raise the platform to a good height. Sand the wood to avoid rough edges.
- Choose sturdy wood like pine or oak
- Cut the platform to fit your mixer size
- Attach legs firmly with screws or nails
- Finish with paint or sealant for durability
Stacked Shelf Units
Stacked shelf units give you more storage space under the mixer. You can keep bowls, ingredients, or tools below.
Use ready-made shelves or build simple boxes to stack. Make sure the top shelf is strong enough to hold the mixer.
- Use plywood or MDF boards for shelves
- Secure shelves with brackets or screws
- Keep shelves spaced for easy access
- Add wheels if you want to move the stand
Rolling Carts
Rolling carts make your mixer easy to move around. This design suits small kitchens or shared workspaces.
Start with a sturdy cart frame and add a wooden platform on top. Include side handles for better control.
- Choose a cart with lockable wheels
- Make the top surface flat and stable
- Use lightweight materials for easy movement
- Add storage shelves or hooks if needed

Credit: www.familyhandyman.com
Creative Stand Ideas
A mixer stand helps keep your kitchen organized and saves space. You can build your own stand with many creative ideas.
These DIY stands can be simple or stylish, fitting any kitchen style or need.
Multi-tiered Storage Stands
Multi-tiered stands have several shelves to hold your mixer and accessories. They help keep everything in one place.
You can add baskets or hooks to store bowls, beaters, and spatulas. This design saves counter space and keeps tools handy.
- Use wood or metal shelves for strong support
- Make shelves adjustable to fit different items
- Add small drawers for extra storage
- Keep the stand compact for small kitchens
Convertible Workstations
Convertible workstations change from a mixer stand to a full work surface. This idea is perfect for small kitchens.
You can fold parts of the stand up or down to get more space for mixing or prep work. Wheels make it easy to move.
- Include a fold-out side table for extra space
- Add wheels for easy moving and storage
- Use sturdy hinges for safety
- Include storage under the work surface
Decorative Painted Stands
Painting your mixer stand adds personality to your kitchen. Choose colors that match your decor or make a bold statement.
Use stencils or patterns to decorate the stand. You can also add chalkboard paint to write notes or recipes.
- Use non-toxic paint safe for kitchens
- Try pastel colors for a soft look
- Add floral or geometric patterns with stencils
- Include chalkboard paint for notes and reminders
Step-by-step Building Tips
Building a DIY mixer stand is a fun and useful project. It helps keep your kitchen organized and your mixer within reach.
Follow these easy steps to create a strong and stable stand for your mixer. You will learn how to measure, cut, assemble, and finish your stand.
Measuring And Cutting
Start by measuring the size of your mixer and the space where you want the stand. Accurate measurements make sure the stand fits well.
Use a pencil and ruler to mark the wood pieces before cutting. Cut slowly and carefully for clean edges.
- Measure width, height, and depth of the mixer
- Mark wood pieces according to measurements
- Use a saw to cut pieces along the marks
- Sand edges after cutting for smoothness
Assembly Techniques
Put the cut pieces together using wood glue and screws. Wood glue holds parts tightly, and screws add strength.
Use clamps to hold pieces while the glue dries. Check that the stand is level and stable during assembly.
- Apply wood glue on edges before joining
- Clamp pieces to keep them steady
- Pre-drill holes to avoid wood splitting
- Drive screws carefully into pre-drilled holes
- Check for level and adjust if needed
Finishing Touches
After assembly, sand the entire stand to remove rough spots. Smooth surfaces look better and are safer to touch.
Apply paint or wood finish to protect the wood. Choose a finish that matches your kitchen style.
- Use fine-grit sandpaper for a smooth finish
- Remove dust with a clean cloth before painting
- Apply one or two coats of paint or varnish
- Let the stand dry completely before use
Safety And Stability Considerations
Building a DIY mixer stand needs careful thought about safety. A stable stand stops accidents in the kitchen.
Strong support and secure parts keep your mixer safe during use. This helps avoid spills and damage.
Weight Support
Your stand must hold the mixer’s weight without bending or breaking. Use sturdy materials like wood or metal.
Check the mixer’s weight before you build. Make sure the stand can carry at least 20% more than that weight.
- Choose thick wood or metal for the frame
- Use strong screws and bolts for joints
- Test the stand with weights before use
Non-slip Features
Add non-slip pads or rubber feet under the stand. This stops the stand from moving on smooth floors.
Non-slip surfaces protect your countertop and keep the mixer steady during mixing.
- Use rubber or silicone feet on the stand base
- Place a non-slip mat under the stand if needed
- Check for any wobbling before using the mixer
Securing The Mixer
Fix the mixer to the stand so it won’t tip or slide off. Secure clamps or straps work well.
Make sure all fasteners are tight and check them often. A loose mixer can cause spills or injuries.
- Use clamps that fit your mixer’s base size
- Try adjustable straps for different mixer models
- Regularly check and tighten all securing parts
Customizing For Your Kitchen Style
Building a DIY mixer stand lets you fit it perfectly into your kitchen. You can make it match your style and needs.
Customizing your stand helps keep your kitchen organized and stylish. Small changes make a big difference.
Color Coordination
Pick colors that match your kitchen walls and cabinets. This creates a smooth, unified look.
Use paint or wood stain to match or contrast with your kitchen theme. Bright colors add fun, while neutrals keep it calm.
- Match wood tones with your kitchen furniture
- Use colors from your backsplash or tiles
- Try a bold color to make the stand a focal point
Adding Storage Hooks
Hooks on the side or front hold tools like spatulas and whisks. They keep things handy and tidy.
Choose sturdy hooks that fit your tools. Place them where you reach easily during baking or cooking.
- Install hooks on the side for larger tools
- Use smaller hooks for measuring spoons or brushes
- Keep hooks spaced to avoid crowding
Incorporating Drawers
Drawers add hidden storage for attachments and small items. They keep your mixer area neat.
Build shallow drawers to fit under the top surface. Use smooth slides for easy opening and closing.
- Store mixer beaters and bowls in drawers
- Use dividers to separate small parts
- Label drawers for quick finding
Maintenance And Care Tips
Keeping your DIY mixer stand in good shape helps it last longer. Regular care makes it safe and stable to use.
Simple steps like cleaning and checking the stand can prevent problems and keep it looking nice.
Cleaning The Stand
Wipe the stand often to remove dust and food splashes. Use a damp cloth with mild soap for best results.
Avoid harsh cleaners that can damage the finish. Dry the stand completely to stop rust or wood damage.
Protecting Surfaces
Place mats or pads under the mixer to stop scratches or dents on the stand. This also helps keep it steady.
Keep the stand away from water or heat sources. These can weaken the materials and cause warping or rust.
- Use rubber or silicone mats
- Avoid placing the stand near sinks or ovens
- Keep liquids off the surface
Regular Inspections
Check the stand regularly for loose screws or cracks. Tighten or fix parts as soon as you find issues.
Look for signs of wear that might affect safety. Fix problems quickly to keep the stand strong and safe.
- Inspect screws and bolts monthly
- Look for wood splits or metal rust
- Repair or replace damaged parts

Credit: www.reddit.com
Frequently Asked Questions
What Materials Are Best For A Mixer Stand?
The best materials for a mixer stand are wood, metal, or durable plastic. Wood offers a classic look, while metal provides sturdiness. Durable plastic is lightweight and budget-friendly. Choose based on your kitchen style and needs.
How Can I Make A Sturdy Mixer Stand?
To create a sturdy mixer stand, use strong materials like plywood or steel. Ensure proper joints and reinforcements. Adding non-slip feet can increase stability. Follow a reliable DIY plan for best results.
What Tools Are Required For A Diy Mixer Stand?
Common tools for building a mixer stand include a saw, drill, screws, and measuring tape. Depending on the design, you might need a sander for smooth finishes. Always prioritize safety with protective gear.
Can A Mixer Stand Save Kitchen Space?
Yes, a mixer stand can save space by organizing your kitchen appliances. It provides a dedicated spot for your mixer, freeing up countertop space. Opt for a design with additional storage options for maximum efficiency.
Conclusion
Building your own mixer stand can save space and money. Choose materials that suit your kitchen style and needs. Simple tools and creativity make the process fun and easy. A sturdy stand keeps your mixer steady and ready to use.
Try different designs until you find what works best. Enjoy baking with your new, custom mixer stand. It adds convenience and a personal touch to your kitchen. Start your project today and see the difference it makes!
12 min read